

Here is an article that was particularly close to my heart! Since we have been running Biovie with Aurélie, we have been helping thousands of people incorporate more plant-based foods into their diets. And the homemade fermentation, it is truly one of the pillars of this approach. However, I regularly notice that many people are still hesitant to get started. Too complicated? Too risky? Not enough time? Honestly, if you're asking yourself these questions, this article is for you.
The short answer to "where to start": fruit kefir. Ready in 24 to 48 hours, almost impossible to miss, delightfully sparkling. But I will explain why, and above all, give you all the keys to succeed in your first fermentation, whichever one you choose.
Why get into home fermentation ?
A question of economic and ecological common sense
Specifically, a liter of fruit kefir costs you just a few cents once you have your grains. Compare that with commercial probiotic drinks at 3 or 4 euros per bottle. For the Lacto-fermented vegetables, It's the same story. A jar of organic sauerkraut in the store? Between 5 and 8 euros. Homemade with an organic cabbage from the market? Less than 2 euros, and you control everything.
And then there is the zero waste aspect that is important to us at Biovie. Fermenting your food also drastically reduces packaging. No more plastic bottles, no more industrial jars to recycle. Just your reusable containers, fresh ingredients, and a little patience.
Live probiotics, not "marketing probiotics"
I must be honest with you about an important point. What you find in stores under the label "probiotics" often has nothing to do with what you get with a homemade fermentation. Studies show that homemade kefir can contain up to 50 different strains of beneficial bacteria and yeasts. Dietary supplements? Generally between 5 and 15 strains, and often in a freeze-dried form whose viability is questionable.
This is not to disparage supplements; in fact, we offer some in the store for specific uses. However, for a daily intake of varied and live probiotics, nothing beats homemade fermented foods.

What type of fermentation to choose when starting out ?
This is THE question we are asked most often. And I understand the confusion: between kefir, the Kombucha, Sauerkraut, kimchi, tempeh, miso... it can quickly feel overwhelming. So here is my practical advice, based on years of guiding beginners.
Fruit kefir: my number one choice for true beginners
If I had to recommend only one fermentation to start with, it would be the fruit kefir. And I will explain why with concrete arguments.
The fermentation time is short. In 24 to 48 hours, you have your drink ready. Psychologically, it's important. You don't have to wait three weeks wondering if everything is going well. In two days, you have a result, you can taste, adjust, and start again.
The signs of success are evident. Fermenting fruit kefir is fizzy. You can see the bubbles rising and the grains gently moving. There is no ambiguity. When it's ready, it's obvious. This immediate visual feedback greatly reassures beginners.
The taste is accessible. A slightly sparkling, tangy, refreshing drink. Even people who are resistant to fermented flavors generally enjoy fruit kefir. It's an excellent gateway.
The risk of failure is minimal. In 18 years, I have never seen a fruit kefir truly "failed" to the point of being dangerous. At worst, it can be too acidic if you have left it for too long, but it remains consumable. You can also consult our Complete recipe for fruit kefir for a detailed step-by-step guide.

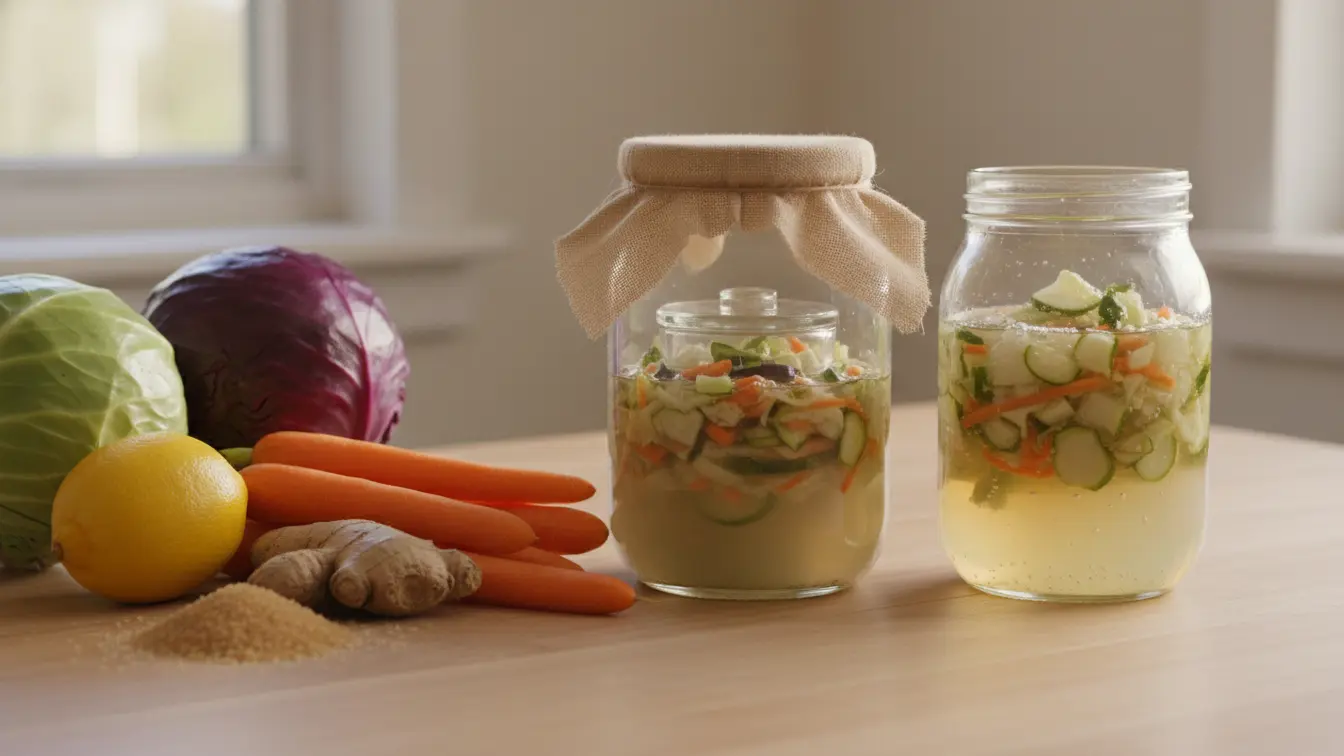
Lacto-fermented vegetables: simple and rewarding
Once you have mastered kefir, or if you prefer to start directly with something savory, the Lacto-fermented vegetables are an excellent option.
The principle is disarmingly simple: vegetables, salt, sometimes water, and you let the naturally present bacteria do their work. No need for a starter, no need for a specific culture. Nature does the job.
To start, I consistently recommend radishes or carrots. Why? Because they remain crunchy even after fermentation, unlike softer vegetables that can become mushy if you lack experience. Radishes, in particular, are almost foolproof: they ferment well, retain their color, and the taste is delicious.
The fermentation time is longer than for kefir, expect between 5 and 21 days according to the ambient temperature and your taste preferences. But here too, the signs of success are clear: bubbles rising, a pleasant slight tangy smell, a characteristic tangy taste. To delve deeper into the benefits of this ancient technique, our article on the Lacto-fermentation will provide you with all the necessary information.
Kombucha: To Go Further
The Kombucha, it's a notch above in terms of complexity. Not that it's difficult, but it requires a bit more attention and equipment.
You need a kombucha mother, the famous SCOBY (Symbiotic Culture of Bacteria and Yeast) that looks like a gelatinous disc. You also need to master the dosage of tea and sugar, manage the two successive fermentations if you want bubbles, and monitor the ambient temperature over a period of 7 to 14 days.
This is absolutely not insurmountable, and the 5 benefits of kombucha fermenter ces aliments grâce à de nombreuses ressources disponibles en ligne ou dans des livres spécialisés. Une fois que vous vous sentez à l'aise avec ces techniques de base, vous serez prêt à vous lancer dans la préparation de kombucha, qui est une boisson fermentée à base de thé sucré. make your own kombucha mother if you wish to be completely autonomous.


How to Choose? A Practical Summary
Here is what I recommend based on your situation:
Are you in a hurry and want quick results ? Fruit kefir, without hesitation. 24-48 hours and it's ready.
Do you prefer savory over sweet ? Lacto-fermented vegetables, starting with radishes or carrots.
Do you already have some experience in fermentative cooking ? Kombucha is an excellent and stimulating challenge.
Do you want to understand the differences between these drinks ? Our Comparison between kombucha and kefir will help you see more clearly.
To summarize very concretely:
- Water kefir : preparation time 10 minutes, fermentation 24-48h, difficulty very easy, taste sparkling and fruity
- Lacto-fermented vegetables : preparation time 20-30 minutes, fermentation 5-21 days, difficulty easy, tangy and crunchy taste
- Kombucha : preparation time 30 minutes, fermentation 7-14 days + 2-4 days of second fermentation, medium difficulty, slightly sparkling tangy taste
The basic equipment for fermenting at home
I will be direct with you: don't spend a fortune on sophisticated equipment. When I started fermenting almost twenty years ago, I only had some repurposed jars and a corner of the countertop. And it worked very well.
What is truly essential
Glass jars. It's the minimum. For kefir, a one-liter jar is enough to start with. For vegetables, mechanically sealed jars like Le Parfait are ideal because they allow gas to escape while preventing air from entering. Screw-top jars also work, but you need to remember to open them regularly to release the pressure.
Unrefined sea salt. For the Lacto-fermentation, the choice of salt is crucial. Absolutely avoid refined table salt that contains anti-caking agents and sometimes added iodine, as these additives can disrupt fermentation. An untreated gray sea salt is perfect. Our article on the Choice of salt for lacto-fermentation Detail all the criteria.
Quality water. The chlorine present in tap water can inhibit good bacteria. You can either let your water sit for a few hours in the open air to allow the chlorine to evaporate, or you can use filtered water. We have personally been using an Ecofiltro for years; it's an economical and ecological solution.
Kefir grains or a starter culture. For kefir, you need live grains. They are passed from person to person, sometimes found in exchange groups, or you can obtain some from quality kefir grains to be sure to start off on the right foot.
What is optional but practical
A fermentation weight to keep the vegetables submerged, but a folded cabbage leaf works just fine. A label maker to note your jar dates, but a marker on adhesive tape also works. A thermometer if you want to be precise, but your hand is enough to feel if it's "room temperature."
The initial investment is around 30 to 50 euros if you start from scratch. And most of this material will serve you for years, even decades.
The 3 steps to successfully complete your first fermentation
After having guided hundreds of people in their beginnings, I have identified three key steps that make the difference between a successful fermentation and an abandoned one.
Step 1: Choose quality ingredients
This may seem obvious, but I repeat it because it is fundamental. Fermentation amplifies everything. The good nutrients as well as the bad compounds. If you start with conventionally grown vegetables full of pesticides, you will find these substances in your final product.
Favor organic products as much as possible. For fruit kefir, choose untreated lemons, non-chlorinated water, and unrefined sugar. For vegetables, opt for fresh products, preferably local and seasonal.
And let's be frank: just because it's organic doesn't mean it's perfect. We know this well at Biovie, as we have been striving for years to democratize organic products while remaining aware of their limitations. However, in the context of fermentation, starting with organic ingredients truly minimizes the risk of contamination by chemical residues.
Step 2: Start the fermentation correctly
The secret to a good start is to create an environment conducive to beneficial bacteria from the very beginning.
For fruit kefir, it's simple: sugary water, your grains, half a lemon, a dried fig for minerals. Cover with a breathable cloth, leave at room temperature (ideally between 18 and 25°C), and wait.
For the Lacto-fermented vegetables, The crucial point is to fully submerge your vegetables under the brine. Lactic bacteria work in an anaerobic environment, meaning without oxygen. If pieces of vegetables float to the surface and remain exposed to air, it opens the door to mold.
A practical tip I often give: reserve the large outer leaves of your cabbage or vegetable to create a "natural lid" that keeps everything submerged. It's free and effective.
Step 3: Recognize a successful fermentation
This is often where worry sets in. "Is what I'm seeing normal?" "Is this smell a good sign?" I understand these questions; we've all been there.
Here are the positive signals of a homemade fermentation which is going well:
- Bubbles. For kefir as well as for vegetables, bubbles rising to the surface are an excellent sign. It is the production of CO2 by the bacteria, proof that they are active.
- A pleasant tangy smell. No rot, no mold. A lively acidity, somewhat like light vinegar, sometimes with yeast notes for the kefir.
- A slight disturbance of the liquid. For vegetable brine, it's normal for the liquid to become a bit cloudy. These are the bacteria in suspension.
- Kefir grains that are growing. If your grains are multiplying, it means they are in great shape.
Conversely, beware of these warning signs:
- Colored molds on the surface. Green, black, pink: throw it away and start over.
- A putrid or repugnant smell. Fermentation smells acidic, not rotten. If your nose tells you "it smells bad," trust it.
- A really unpleasant taste. Acidity is normal, excessive bitterness or "off" flavors are not.
When in doubt, a simple rule: trust your senses. We have millions of years of evolution behind us to detect spoiled food. If something seems suspicious to you, don't insist.
5 beginner mistakes to absolutely avoid
By supporting people who are starting the homemade fermentation, I have identified the most common mistakes. Here they are, along with solutions to avoid them.
Error #1: incorrect salt dosage -> prefer seawater !
Too little salt, and harmful bacteria can develop. Too much salt, and fermentation is inhibited. The classic rule for a lacto-fermentation brine is 2 to 3% of the total weight in salt. Specifically, for 1 kg of vegetables and water, use 20 to 30 grams of salt.
If you prefer to avoid salt for health reasons, know that it is possible with certain techniques. Our article on the lacto-fermentation without salt explore these alternatives.
And favor seawater instead of water and salt, you will enjoy all its benefits !
Error #2: vegetables that are not submerged
I have already mentioned it, but I repeat it because it is truly the primary cause of mold. Any vegetable exposed to air is at risk of developing mold. Use a weight, a cabbage leaf, anything to keep your vegetables below the level of the brine.
Error #3: an inappropriate temperature
Fermentation is sensitive to temperature. Too cold (below 15°C), it slows down considerably or stops. Too hot (above 30°C), it accelerates and can develop unpleasant flavors or promote harmful bacteria.
The ideal lies between 18 and 24°C. In winter, a kitchen cupboard away from the windows is often perfect. In summer, avoid leaving your fermentations in direct sunlight or in an overheated room.
Error #4: opening the jar too often
I understand the curiosity, the desire to see how it evolves, to feel, to taste. But each opening introduces oxygen and potentially contaminants. For the Lacto-fermented vegetables In particular, try to resist the temptation for at least the first 5 days.
For kefir, it is less critical because the fermentation is rapid and the grains are robust. However, still avoid dipping unclean utensils into your preparation.
Error #5: Being afraid to take the plunge
This may be the most common and most damaging mistake. I regularly meet people who read article after article, watch video after video, accumulate information... and never dare to take action.
Honestly? Fermentation is something you practice. You can read all the guides in the world, but nothing will replace the experience of seeing your first kefir grains activate, smelling the acidity of your first lacto-fermented radishes, and realizing that yes, it works, and it's not that complicated.
My philosophy: it's better to have an imperfect first attempt than a perfect preparation that leads to nothing. You will learn ten times more by doing than by theorizing.
Frequently Asked Questions About Home Fermentation
I am compiling here the questions we are most frequently asked, with direct answers.
Is homemade fermentation dangerous ?
No, the homemade fermentation is extremely safe when basic rules are followed. The acidic environment created by lactic bacteria (pH below 4.6) prevents the development of any dangerous pathogens. In 18 years of experience, we have never encountered a problem with properly conducted fermentations. The signs of a failed fermentation are obvious and detectable by your senses: repugnant odor, colored molds. When in doubt, trust your nose and common sense.
Which fermentation to start with ?
The fruit kefir is the ideal fermentation for beginners. Ready in 24-48 hours, almost impossible to fail, deliciously fizzy. If you prefer savory, start with brined radishes or lacto-fermented carrots: these recipes are foolproof and rewarding.
How long does fermentation last ?
It depends on the type of fermentation and your taste preferences. Fruit kefir is ready in 24 to 48 hours. The Lacto-fermented vegetables ask between 5 and 21 days. The Kombucha requires 7 to 14 days for the first fermentation, plus 2 to 4 days if you want a second fermentation with bubbles. Note that you can then drink kefir every day once you have mastered your production.
What equipment is needed for fermentation ?
The bare minimum: glass jars, unrefined sea salt for the vegetables, non-chlorinated water, and grains or a starter culture depending on the type of fermentation chosen. Initial budget: 30 to 50 euros to start properly.
Is it possible to fail a fermentation ?
Yes, but it is rare if you follow the basics. The most frequent failures are due to poorly submerged vegetables (mold), unsuitable salt, or an extreme temperature. In any case, the signs of failure are obvious, and you are unlikely to consume something dangerous without realizing it.
What is the difference between kefir and kombucha ?
These are two fermented drinks with very different profiles. Kefir uses kefir grains and ferments in 24-48 hours, producing a slightly fizzy and tangy drink. Kombucha uses a culture called SCOBY and sweetened tea, ferments in 1 to 2 weeks, and has a more vinegary taste. Our detailed article on the Differences between kombucha and kefir explore this topic in depth.
Do fermented foods help with weight loss ?
The fermented foods do not "slim down" in the magical sense of the term. However, they promote a balanced gut microbiota, which can have positive effects on digestion, nutrient absorption, and appetite regulation. When integrated into an overall healthy diet, they are an asset for weight management. To understand all their benefits, consult our guide on the Benefits of fermented foods.
Where to find kefir grains ?
Several options: exchange groups between individuals, local fermentation associations, or specialized shops like ours. The important thing is to start with live and healthy grains. Tired or poorly preserved grains will take longer to start or may yield disappointing results.
Go for it, really
If you have read this article up to this point, it means you are genuinely interested in the subject. So here is my final advice, the one I give to everyone who asks me where to start: stop seeking perfection and take action.
Get some kefir grains. Put them in a jar with sugared water and half a lemon. Wait two days. Taste it. You have just completed your first fermentation.
It's as simple as that.
Then, you can explore lacto-fermented vegetables, kombucha, maybe even homemade plant-based yogurts or Korean kimchi. But for now, one first step is enough.
If you wish to delve deeper and integrate these practices into a more comprehensive approach, our article on how to start with a raw food diet will give you an overview.
And as we say in our country: Try it, and you'll love it !


?")
: Complete Guide")

")
